How I came to buy this little dynamo and some secrets on how to set it up for rapid deployment.
Let me start by saying I am a professional Photographer. I’ve been going strong as an entrepreneur running Mark Gilvey Creative since 2013. But I’ve been in the creative industry since the 1980s. I’ve made my special brand of art and photography for web design firms, ad agencies, government contractors, animation studios, photography studios, and even a small newspaper in a little town called Pottstown, Pennsylivania.
I told you that so I can tell you this. I’m scared $#@&less about taking photos of people, particularly when I don’t have a reason. If I’m on an assignment, I can take charge and dish out orders. But when I’ve got my “street photography” hat on, I quiver at the knees like a squirrel who can’t reach a nut. So it was important for me to look for a camera that would help me blend into the environment so I didn’t have to invade peoples personal space.
This blog post is not intended to be a product review. It is more of a pre-purchase and post-purchase field guide. My goal is to give you a list of the features I was looking for in an everywhere-camera. While that might sound like the obvious, keep in mind that I’m looking for pro features. Therefore I’m not going into what I call the “consumer” features. Second, I want to tell you how I am currently working with the camera with tips on how to set it up so you’re not goofing around searching for settings every time you turn it on.
But first, lets look at when this desire began by jumping back a few years.
The Day I Liked A Leica
 I spent the 1980’s drooling over the Leica M3. I remember the first time I held one. Surely you remember the first time you had a memorable experience holding a camera don’t you? I must be off my rocker. My friend Ron and I stopped by a Leica booth at a camera show that was being held in nearby Monroeville. They had several M3’s including the standard chrome body, a black one and if my memory serves me right, there was also an Army green version that had a motor drive/battery pack that hung down about 4 inches from the body—that was kind of an odd sight to see on a rangefiner. The rep said that they were the camera of choice for photographing in court rooms because of how quiet the shutter is.
Many people have fallen in love with with this cameras’ simple clean design and of course, the lens sharpness. But what got my heart pounding was the sound of the shutter! It wasn’t even a “click!” It was more like a “kih.” Not even a click! This thing was really quiet.
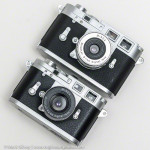
5mp (top) and 4mp version (bottom) of DCC Minox Leica M3. Minox even makes a twin lens reflex this size.
And so I walked away, wanting to have this camera for the next 28 years. Now that we are well into the digital age of photography and the M series is still going strong, I finally broke down and got my own, brand new, digital Leica M series camera for $200 while flying between Washington DC and Paris on an Air France flight. Well, that’s not entirely accurate. I actually purchased a camera from the same era that I also admired for its “James Bond” appeal; a Minox. In fact, this one was a replica of the Leica M3 in miniature. It’s called the DCC Minox Leica M3. The first one I puchased was 4mp. It would try to color correct everything, drank the energy out of the battery and had an LCD display that didn’t work that well.
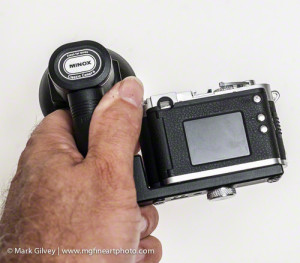
This is the back of the 5mp version. It’s so adorable!!!!! You can really look through the rangefinder but there’s no image adjustment. You can also rotate the lens to focus; you just don’t see it in the eye piece. I just wish the image quality was better but it was really made for the collector.
Then I purchased the next version, a 5mp which was a little bigger and worked a little better. They are fun little cameras. I even have a bracket flash for 5mp version. Unfortunately they don’t have near the precision that they should despite the excellent reproduction and moving, but not operating parts on them. The film advance would cock and spring back for example, but it was just for show.
The 5mp version has now taken its place on my camera shelf, aptly known as the Museum of Outdated Photographic Technology and the 4mp version is hanging on a lanyard that I wear like a pendant when I go to photography events. Below is a photo that will give you a better idea of the size of the 4mp version.
Later, I purchased an Olympus XA and then the XA-2. These were great little cameras because they were really small and had very quite shutters. Unfortunately, I didn’t use them that often because they didn’t have any manual override.
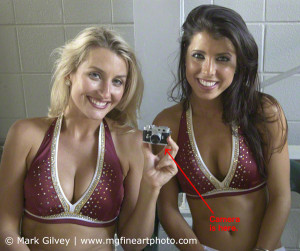
The two young ladies are Redskinettes. I photographed them holding my first version of this camera in 2006. You should see the camera very easily, it’s right there, see it?
THE QUEST BEGINS
And so, in 2014, the quest for a digital rangefinder style camera that looked and felt like a Leica M series had begun.
Why get a rangefinder style camera?
The reason I wanted this style of camera was so I could blend in—hide in plain site. I’ve been using DSLRs and SLRs for years. Once I get on a roll, I can get in someones bubble (while hiding behind the large DSLR body mounted with a 15mm ultra wide angle lens.) It’s easier in a crowd or busy environment but I cannot do that in a quite situation.
I’ve taken my DSLR gear around the world (well, not completely around, maybe ooh I’d say 25% of it) with me for many years and have taken some wonderful images with it. You can see some of them on this website. But during my most recent trip to Martinique, I had the opportunity to go to the top of Mt. Pelée. An active volcano that exploded in 1892. Now, there is a trail that goes up the mountain, down into the crater, across the middle of it, up the opposite side, around half the rim and back down. My brother in-law tells me it takes 6 hours to walk.
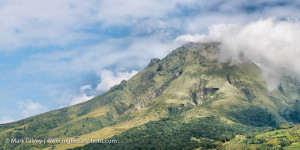
I photographed Mt. Pelée on this day with a Nikon D810 and an 80 – 400mm Nikkor VR zoom at 80mm. The photo took about 20 frames, all handheld. They were processed in Lightroom and stitched in Kolor Auto Pano Giga. The photo is about 7′ 6″ at 100% (300dpi). If I could get a rangefinder style camera that had an 85mm at the long end of an optical zoom so I could make these kinds of large panoramas, I’d be a happy camper.
But as I walked through the steep inclines within the towns I visited, I found myself panting just carrying a DSLR and a small pouch with two lenses. There was no way I was going to make it six hours with all this gear walking at steep angles. This, coming from the guy who says “who cares about weight?” Well let’s just say weight makes more of a difference when I’m not shooting on an assignment.
OK, yes, I haven’t been to Taekwondo class in a long time so I need to get my @$$ to class and build up my endurance and coordination. I also need to get on my bicycle and ride, ride, ride. So, it was probably wishful thinking that I would go up that mountain without rolling down it, falling flat on my face. Another time I think.
Fortunately (or unfortunately) for me, the peak was in clouds every day so the trek wasn’t going to happen. I was planing to go up with a 14mm and a 24-85mm zoom. I wanted to shoot a few of my mega-pans during the trek but I couldn’t bring my tripod because it was just too heavy—even though it was made with carbon fiber. So, a smaller camera that wouldn’t require so much effort but still had great image quality was what I needed.
The Search For A Leica-Like Utopia
While I was never a big fan of their SLR cameras in the 1970’s, FUJIFILM was looking pretty good on the rangefinder style front in the digital age. Their X-Pro 1 immediately got my attention with its design and interchangeable lenses, but it was behind the other technology that even FUJIFILM was producing. I know that many people are waiting for the next generation of this camera and were sad when FUJIFILM did not make an update announcement at Photokina this year (2015.) Then there was the X100T with its beautiful retro look and it had everything I wanted (at the time.) Even the X30 had great possibilities because of the flip-up LCD screen and good optical focal lenght—I really liked them all. But as I looked at camera features of these and other manufacturers, I had to ask myself how I was going to use it.
“Self? How are you going to use this camera?”
I’m glad you asked. First and foremost is it will be used for street photography. Whether I’m getting in close to people with a wide angle (which I love doing once I get my nerve up) or photographing juxtaposed shapes and colors, this type of photography is the driving force behind the camera I choose.
Second, I want a camera that I can shoot panoramic images with. It needs a telephoto because that is the best way to get large-format resolution from a small format camera. You just need a program like Kolor Auto Pano that can handle stitching the images together. Photoshop doesn’t play nice with multi-row panos.
I’m not interested in shooting sports, products, or doing flash photography with it (now watch, I’ll get gig where someone wants me to do that with this camera.) I’m not interested in shooting selfies because my mobile phone is faster for that.
This is not my first camera. This is not a beginning camera.
It is a camera for a specific purpose.
I think I hit everything.
MY RANGEFINDER STYLE REQUIRED FEATURE LIST for the STREET PHOTOGRAPHER
 The first thing that appealed to me was a camera that would let me hold it at waste level and still see through the viewfinder to compose. Or in this case, an articulating LCD screen. I used to shoot with Hasselblad cameras that were held this way and since Vivian Maier used to shoot this way (and she’s the latest hot discovery in the street photography genre and many photographers want to photograph like her) it was a hot item on my wish list.
As I learned more about the different types of LCD screens, I decided it would be best to get one that had a screen that flipped upward instead of out to the side. This would give me the ability to look down into it and compose my shot.
To take the LCD screen requirement to another level, I looked for a camera that had a screen that would flip completely above the top of the camera. I knew if I did any tutorial videos that being able to see the monitor would let me frame myself better. And I suppose it would look a little more natural if I glanced up, instead of off to the side of the camera (if the screen went to the side instead of above the camera body.)
That feature alone, pretty much eliminated getting any of the Nikon models. Their screens flip out to the side which makes their cameras look bigger than a DSLR and that interfered with my need to blend in.
 I made up my mind that I didn’t need interchangeable lenses. I had a DSLR for that. In fact, if I could get a camera that had an optical wide angle (24mm) to short telephoto (85mm), I would be happy. I wasn’t interested in a digital zoom because the quality is just bad; really bad! When I shoot panoramas, I use an 85mm so the camera had to have that in its optical range so I could continue to make pans.
 The camera also had to have a real viewfinder that you put your eye up to. I didn’t care if had parallax or if it was a video display of what was coming through the lens. I just wanted to be able to see an image in bright sunlight since LCD monitors can be very difficult. And I didn’t want to look like a zombie holding the camera out in front of me—BRAINS!!!!
 I was also interested in something that had 16mp or more and shot in RAW. My Nikon D300 had 12mp which was a really nice step up from the 6mp Nikon D90 I have. But it wasn’t really enough so I thought 16mp + would be better. My Nikon D810 makes a 36mp image, it’s a lot of data but I don’t feel I need that much for street work.
 A hot shoe (or a PC outlet) would also be nice because I could put a Pocket Wizard on it and shoot with studio strobes. Then I decided that I would probably never photograph with this camera in the studio since I had the D810 so I put that idea back in the closet. I could always trigger strobes using the on-camera flash and a light trigger (peanut) anyway.
 The camera absolutely had to have full manual override. I still don’t trust automatic anything—particularly when a scene has a lot of contrast. I wanted to be able to control the aperture and shutter speed independently because I want to know what the camera is doing. I don’t expect the camera to automatically know when I want to shoot slow vs. a fast shutter speed. In addition, I have a personal exposure guide I use when photographing “street” (more on that below.) Also, with automatic settings, I have a tendency to just start shooting without thinking about what I’m doing.
 I wanted to be able to custom white balance. Again, I wanted manual control. I’ve never trusted auto white balance. Like auto exposure, you never know what you are going to get in the next frame.
So I searched the camera store websites, did the YouTube crawl, and a couple of review websites. One camera kept coming up with really great reviews; the Sony RX100 MK III. It was pricy but in my eyes, even before purchasing it I could tell it was worth it.
THE DECISION WAS MADE AND UTOPIA WAS PURCHASED!
T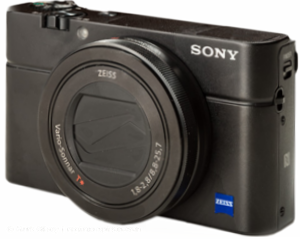 his was it! So I purchased it from my local pro camera shop; PhotoCraft in Burke, VA. I love to get great deals on new camera gear by ordering on line but you’d be surprised how competitive local business owners can be these days. And, customer service is always better from a local merchant than from a website.
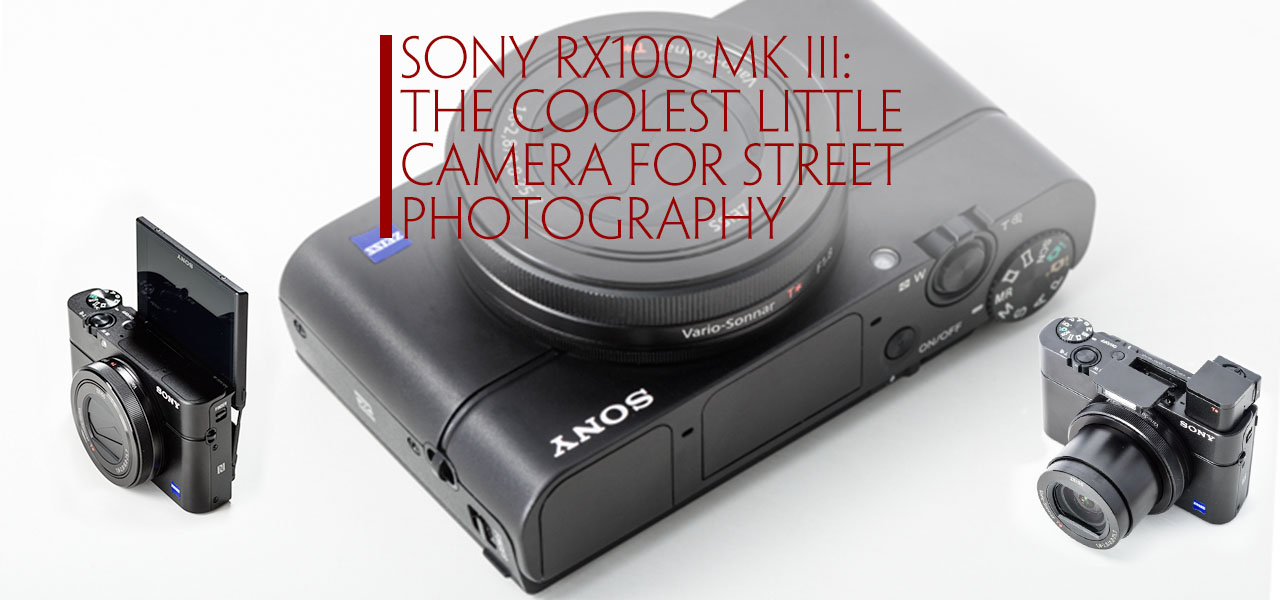
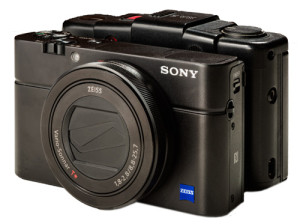
It’s not a true rangefinder but has the appearance of one. Ok, it’s a point-and-shoot that feels like a rangefinder. In fact, it looks like a miniature Leica M series camera. A couple of things made my heart race about this camera:
It is smaller than my Olympus XA-2 film cameras! Some of you may remember the XA series cameras during the 1980’s and ’90’s. That camera was the same size as a pack of cigarettes. The Oly would fit into your shirt pocket! The Sony is slightly smaller. Using “today’s” measuring stick, it’s about 15% smaller on the width compared with an Apple iPhone 5.
Talk about being able to blend in and guess what else?
It has full manual control, custom white balancing, full flip-up screen, 24 – 70mm zoom, and 20mp RAW files. Everything I was looking for in the RANGEFINDER STYLE REQUIRED FEATURE LIST—Whoop! Whoop!
And now for the extras that I wasn’t expecting:
- 1080p video (which I’m finding very handy for documenting studio lighting setups)
- Preset modes (will explain later)
- Programmable buttons (so I can set the functions I want instead of a default setup that forces you to work one way instead of your way)
- ISO from 64 – 12,500
- Wireless image transfer: Camera to computer and Camera to iPad
- Focus peaking (shows a highlight on things that are in focus)
- Zebra pattern (shows where your highlights are and is adjustable! Very important when shooting manual so you don’t blow your highlights)
- It has a BULB setting!
- A shutter that goes “kih!” when you turn the sounds off!
What’s wrong with using my iPhone? It’s stealthy, with me all the time, easy to carry, and about half the price!
What are you? My mother? Get out of here! I’m talking about diamonds and you are talking about stones! That said, my iPhone does have two advantages:
- It’s much better at making phone calls than the Sony is
- The power cable that powers the iPhone will also charge the Sony 😉
AbUser Experience
So now that I’ve shot with it several times, I thought I would give you the real meat of this blog post. I’m going to give you the bad news first because there is so little of it and I think, it’s fixable.
Things that make me sad faced 🙁
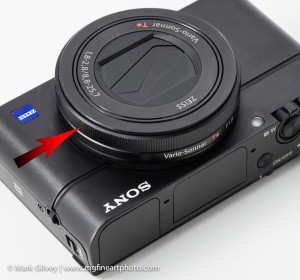 The control ring that rotates, and rotates, and rotates: The lens has a multi-function ring that you can rotate to operate the manual focus or adjust the aperture. It is very smooth to operate but the only issue is the ring has to be rotated waaaaaaay too far.
![]() Focusing: I have to rotate it about three and a half revolutions to get from one end of the focus to the other. It should only be about a half to three-quarters of a turn. Better yet, make it programmable! The long turns are good for fine focus but not when you are in a hurry. Make a short, medium, and long rotation setting; can’t this be done in firmware?
Focusing: I have to rotate it about three and a half revolutions to get from one end of the focus to the other. It should only be about a half to three-quarters of a turn. Better yet, make it programmable! The long turns are good for fine focus but not when you are in a hurry. Make a short, medium, and long rotation setting; can’t this be done in firmware?
![]() 2015/03/19: I stand corrected. After working with the camera some more, I discovered the focusing mechanism is actually speed controlled. The slower you rotate the Control Ring, the slower the focus. You can turn it quickly and in about 1/4 turn get from one end of the focus to the other. Way to go Sony! Programming might not be necessary but there are those who might like an adjustable setting as an option.
2015/03/19: I stand corrected. After working with the camera some more, I discovered the focusing mechanism is actually speed controlled. The slower you rotate the Control Ring, the slower the focus. You can turn it quickly and in about 1/4 turn get from one end of the focus to the other. Way to go Sony! Programming might not be necessary but there are those who might like an adjustable setting as an option.
Aperture: Since this ring also controls the aperture, you have to turn it the same amount to get from all the way open ƒ1.8 to fully closed ƒ11. That’s ridiculous! Can that be fixed in firmware? I should only have to turn the ring, at most, half a turn. Make it happen boys! Luckily, I can also use the Control Wheel that is on the back which is much quicker but I’m not used to using it yet.
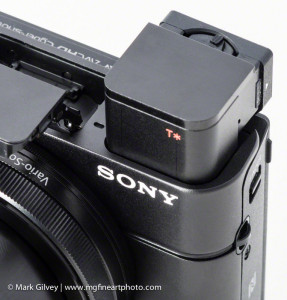 When I close the EVF, the whole camera shuts down and goes to sleep. What if I’m not finished taking photos? What if I just wanted to put the EVF down so it is out of the way? Can that be fixed in firmware?
Since they got rid of the hot shoe that was in the version 2 of this camera, a PC outlet would have been nice but I know I said I could live without it.
That’s it for the critical stuff. The Sony engineers really need to work out that control ring rotation limit. That would help make manual and aperture control quicker which will help me get photographing even quicker. Isn’t that what it’s all about?
The Super Colossal Coolness that is the Sony RX100 MK III
I love the way this camera handles! It even feels like a real camera. It has some weight to it and doesn’t feel cheap in any way. I can pull it out of a pocket or hip pouch, turn it on and take a shot within seconds. I’ll confess though, I’m still learning how to find things. It has a heap-load of features which many new camera buyers will be interested in but I’m not going into here. I am going to address the features and set-ups that will appeal to my street photography brethren and those Pro’s who are looking for quality images from a smaller package.
HOW TO SET-UP THE SONY RX100M3 TO BE STREET PHOTOGRAPHER FRIENDLY
Programmable Modes (banks)
This camera can be programmed so it is set up with all your favorite functions right when you turn it on. Owners of DSLR’s may not have seen this type of feature before so check this out.
Imagine being able to set up several programmed modes where your ISO, starting ƒ-stop, shutter speed, white balance, frame rate, flash mode, and about 10 other functions are already set, ready to go. For example, my default setup out doors is RAW, ISO 200, ƒ-8 @500, 6500˚k. But what if I walked in doors? If I had a second memory bank setup for a slower exposure time (or higher ISO) already configured (or close to it) wouldn’t that be faster than having to think about all that stuff? The important thing is most of your controls are in the ball-park at the click of a button. If I know I’m going to be photographing both indoors and out, one of the banks will be set up with indoor shooting in mind and the other with outdoor shooting.
You can assign all these settings (and more) into any of three banks. Mine are currently set up as follows:
MR (Memory Recall) BANKS
MR BANK A: This is my go-to manual setup when I’m photographing on a sunny day. I use this bank as my starting point and employ my shooting guide (explained below: in FLASHMAN’S STREET PHOTOGRAPHY EXPOSURE GUIDE.)
- Manual exposure: aperture is controlled on lens Control Ring or on the Control Wheel (on the back of the camera) by pressing down and select either Av (or Tv/Time) and rotating the wheel.
- Exposure is set to ƒ8 @ 1/500 at ISO 200
- RAW
- Auto Focus-Single (with the option to focus manually by rocking the Control Wheel to the left)
- Drive Mode: Single
- White Balance: 6500˚ or I’ll do a manual White Balance
MR BANK B: I have been tweaking this bank to accommodate in-door photography.
- Aperture Priority (aperture on lens, ring and shutter speed on Control Wheel)
- Exposure is set to ƒ1.8 at ISO 800 (I want to shoot fast to minimize motion blur most of the time)
- RAW
- Auto Focus-Single (with the option to focus manually by rocking the Control Wheel to the left)
- Drive Mode: Continuous
- White Balance: Cool White
MR BANK C: In JPEG, I can get access to the high speed frame rates. In RAW, I think the fastest frame rate is about 5-6fps. This is probably fast enough anyway but in JPEG, you can get about 11fps…lets just say it’s really fast. The other thing JPEG is good for is wireless transfer to your mobile device. You’ve been there! You know something is about to happen that needs to go straight to your social media. Come on, give it up! You know what I’m talking about. I have this one set for daylight as well.
- Aperture Priority (aperture on lens, ring and shutter speed on Control Wheel)
- Exposure is set to ƒ8 at ISO 200
- JPEG-Fine
- Auto Focus-Single (with the option to focus manually by rocking the Control Wheel to the left)
- Drive Mode: Continuous
- WB 6500˚
I mentioned above that I have a guide I use for street photography. And now without further a due:
FLASHMAN’S STREET PHOTOGRAPHY EXPOSURE GUIDE
It’s not rocket science, it’s quick and dirty and it works for me as a starting point. I use this guide when I have the camera set to MR Bank A.
- Outdoors in bright sun: ƒ8 @ 500th not matter where you point your lens. This exposure will keep your highlights that are in sun from blowing out.
- Outdoors in overcast: ISO 200, ƒ8 @ 250th but it must be overcast, not partly sunny. If there is a mix of clouds and sun, use the exposure above so you keep the bright areas in check. When it becomes mostly cloudy or the subject is only in overcast light and you don’t care about the highlights, use this exposure.
- Indoors: ISO 200, ƒ2.8 @ 60th (4 stops difference from outdoor in bright sun). This is only a starting point but will get you in the ball park. I may switch to my B Bank in this case.
HOW TO BE QUICK DRAW MCGRAW
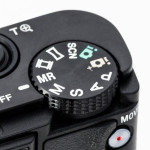
Turn on the camera, (first button push). If you don’t already have the mode and settings you want, don’t mess with it, just select MR on the PASM dial (second button push) and then select an MR Bank (third button push) that is appropriate for the scene you are going into.
When you shut down, either leave it as is or return the PASM dial to a mode you use as your default—I usually select M. If you have your MR banks set up, this will be the fastest way to get back to your own customized settings.
Changing the Duma-Flotchi to a Whatcha-May-Call-It
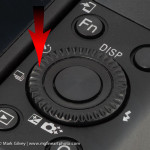
There is also one adjustment I made to the camera usability. The control wheel on the back of the camera has several different functions based on what side you push it on or when you rotate it. I changed the mode that is on the left side of it so when I press it, the camera temporarily switches from Auto Focus to Manual Focus.
How do these presets help me take photographs in quiet environments?
Stealth my friends, stealth! I was experimenting with the camera one evening in a fairly dark room and kept noticing a red light on the wall every time I pressed the shutter to focus. It’s pretty bright and it’s noticeable. That tells me that someone could potentially see me focusing on them if I were photographing them in a dark environment. So I programed the manual focus to engage when I press the left side of the control wheel and I’m in business. I can adjust the focus, without drawing attention to myself.
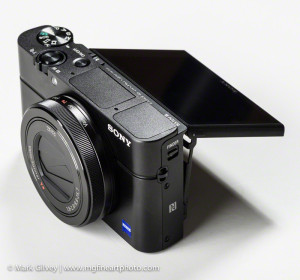
With the screen flipped up, you can compose without giving much indication of what you are doing. This screen flips completely vertical so you can view it from the front it even orients the image correctly. The screen also flips down so you could hold the camera above your head and compose.
I also had focus peaking turned on so I could tell what was sharp without having to put my face right up to the camera. Since I was focusing manually, there was no red light to distract anyone who might be across from me.
With the LCD screen flipped up a little, I could look down into it, compose and get the shot. With the sound turned off the camera goes “kih” which is a very good thing and no one but me can hear it.
ENOUGH TALK: TAKE ACTION!
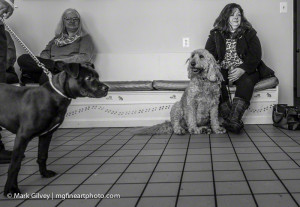
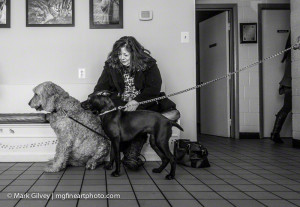
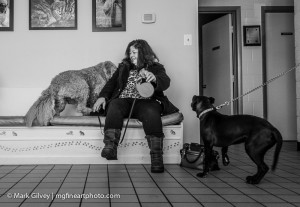
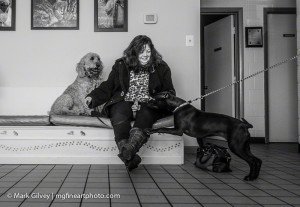
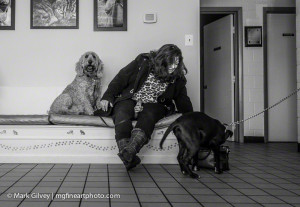
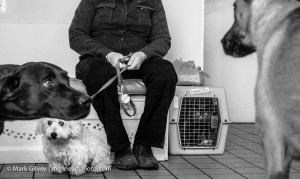
Here is a photographic sequence I took in the Veterinarian office. I enjoy making short sequences; I don’t think that every photo has to be a one-hit wonder. Sometimes, telling the story in a series of images works just as well and it can introduce a whole new story based on the sequence you display them in. These photographs depict some very disconcerting activity taking place only 8 feet across from me. Click for enlargement.
“My Master—The Trader”
I could not have gotten this sequence with my DSLR without attracting attention, and getting strange looks. Instead, I held the camera in my lap, covered part of the front of it with my right hand and my thumb on the shutter button while glancing down into the LCD. I set the manual focus using the focus peaking. I waited and took photos as events unfolded. Then I shut off the camera and covered it up with my hand until more activity began to happen and to recede my presence back into the background. Then I turned it on and continued taking photos.
I also learned a lesson at this location; don’t ever stop photographing! Continue to photograph until the scene becomes a new cut (to put it in movie producer terms.) Because the event you want, the one you will never foresee; will happen while your camera is off. When you turn your camera back on, you will have missed it already. But that’s another story for another post.
CONCLUSION
The Sony RX100 MK III is a solid piece of photo gear. It has reacquainted me with the roots of photography. This little camera gives me all the size and features I want to be able to photograph without having the camera do it all for me. Its file size is significant enough for the type of photography I want to use it for. This camera is very discrete for the street photographer and it packs pro controls. It provides DSLR image quality in a really small package. There are no weird artifacts like inexpensive point-n-shoot cameras have. I’m looking forward to working with this camera in all sorts of ways.
I’ll leave you with one more photo from the Veterinarians office. Click for enlargement.
“Safty in the Shark Cage”
I have come up with some “formulas” for setting up the Memory Recall modes. Subscribe to my blog (top of the page, right side) to be notified when they become available. I will include a link here as well when that happens.
PRODUCTION NOTES: In case you were wondering, I photographed the Sony with my Nikon D810 with a 105mm macro and used Helicon Remote and Helicon Focus to shoot focus stacked images of the close-up views. The camera was cleaned and air blasted and there is still dust on it, even after spotting. I have a new appreciation for this type of product photography and I am a retoucher. Think I’ll try photographing my watch next.
How To Fold Your Tent Canopy
Onward and Upward
Getting Acclimated
How learning your mate’s sleeping habits can get you time alone on your vacation to take the photos you really want.
Exploring The UN-Familliar
How you can discover new photographic opportunities by revisiting the same location. Strategies for finding the time to get out on your own.
Discovering the “Passages” In Your Life
“Passages” is a portfolio of images by Photographic Artist Mark Gilvey that invites us to discover the connections we walk through while going from one point to another.





Thanks for the article, very informative.
I’m glad you like it Dave. If you have a mobile device, check out Adobe Slate (free app). I published some additional info on this topic if this embed code will work:
I am really impressed with your article, since I bought my RX100 MII as primary camera. I explored all it’s features, and I should agree that this camera allow us to shoot without attracting attention of others, while delivering great quality. The other thing is, I really want to explore DSLRs, or mirrorless cameras soon, since I feel I am quite limited if stick with RX100. In any case, your article made me again to decide to stay with RX100 for awhile to take advantage of its size and capabilities. By the way, the thanks for detailed description of what you did with MR setting. That is so useful!
I’ve been really happy with it. The focal length range is a “work horse” range. Anything outside of that, is DSLR territory. I could use it for my magazine work but my DSLR is better for that for speed reasons and visual reasons. I don’t think I’ll be upgrading to the RX100IV since I just got the III but I will certainly get something after that when the time comes. I also picked up a ND and a Polarizing filter for it, and the grip. It looks pretty stout with all that stuff on it now 😉
Just picked up a new RX100M3.
Great article!!!
Are these available?
“I have come up with some “formulas” for setting up the Memory Recall modes. Subscribe to my blog (top of the page, right side) to be notified when they become available. I will include a link here as well when that happens.”
Thanks,
Scott
Thanks for a very informative article. I bought the original RX100, skipped the MKii, and got the MKiii. I took the MKi to Paris in 2013 and spent 10 days doing street photography. (Also used a Sony A77 with 16-50 f2.8 lens.) I loved having a camera that I could take everywhere. Sometimes I left the DSLR at the hotel, but never the RX100.
I have made 3 modifications to the camera that I find useful. First is a grip, second is a clear rimless filter stuck to the front of the lens, and third is a soft “dot” on the shutter release. I had trouble quickly locating the shutter release, so I looked for something to glue onto it. The best one I found, mainly because it is the exact diameter, comes from Ikea. It is actually a kitchen cabinet bumper. I got it for free at the parts window at our local Ikea. It has just enough height and tactile feel that I can instantly locate the shutter release button when I’m in a hurry.
I don’t have any other filters because I don’t use them on this camera. I use a Sony A6000 for landscapes, portraits, and sports action.
What was the button called I have an IKEA right near to me I also purchased the grip and I got a filter holder as well. I just haven’t used any filters on her yet I purchased a neutral density filter which is adjustable and I don’t like it I want to get it fixed neutral density and I purchased a polarizing filter which I have yet to use on it.
I don’t know the exact name of it. But if you look at the inside of a kitchen cabinet door and see a small raised dot that keeps the door from slamming…that’s it. They are stick-on “buttons”. I call it a bumper. But whatever it’s called…Ikea has a parts room, usually near the checkout and bargain area. Ask the attendant for one (or a few) and they will get it for you.
Thanks I’ll check it out. OH, I saw a MK3 at Best Buy in Woodbridge, VA for about $250, no box or manual. I’m really tempted to get it but I don’t really need it if you know what I mean.
That’s a great deal!
Hi Mark,
Thank you very much for your very informative article. I recently purchased an RX100M4 and love its size and its capability as you do with yours.
Here is a question if I may ask… I also tried to set the left key to enable MF but I am not sure what I should choose from the list… Is it “focus mode” (and you actually have to choose MF from the list of focus mode)? If not, maybe there’s some difference between M3 and M4?
Thanks for your help, Mark!
A
Hi Atsushi,
Here is the path I took to get to it:
Select the GEAR icon
Goto page 4
3rd item down “Custom Key Settings”
There are 5 items listed. Here is how I have them setup for me:
Control Ring: Aperture
C Button: In-Camera Guide
Center Button: Eye AF
Left Button: AF/MF Ctrl Toggle
Right Button: Focus Area
Now that I’ve been using it a while here is some feedback on each:
Control RING: Aperture: I rarely use the control ring (the ring around the lens) if at all. Initially I thought I would but I find the Control WHEEL on the back of the camera much faster for me to use. I just push the down button to select either the aperture or shutter speed and spin away.
C Button: In-Camera Guide: I’m not sure I ever use this for anything but deleting photos. Maybe I should try setting it to Memory because I use that more often.
Center Button: Eye AF: I don’t remember what this does and I can’t seem to find it in the PDF manual because it is password protected and not letting me search.
Left Button: AF/MF Ctrl Toggle: In the normal state, this is a self timer which I can’t remember ever using this feature since I was a kid. So it made the most sense to toggle the AF/MF here. That said, each of my Memory banks is set up to have AF on automatically. I find that using the Control Ring do focus is also difficult and way slower than me pointing the camera and depressing the shutter button half way.
Right Button: Focus Are: I set to center and then just point and move the camera to compose while holding the button down. That said, my normal mode is Wide. When I’m walking and taking photos, I don’t always look through the viewfinder or on the LCD display; I just point it in the general direction because I’m trying to capture a moment and I’ll compose in post. For this, I have it set to wide because more often than not, I’m within 2-5 feet of my subject where nothing will pass between us and offset the focus.
Thanks for brining this up, made me evaluate my setup and that’s always a good thing. Check out my latest post on how to edit your RAW files on the road with an iPad and an external hard drive.
Hi Mark!
Thanks for your reply. Yes! I finally found the AF/MF toggle thingy in the menu. Since I got my RX100 in Tokyo Japan and it has Japanese menu, I was totally confused but finally managed to figure that out.
It’s a beautiful day today here in Tokyo so I am going to take out my RX100 and try the new setting for street shooting.
Thanks again!
A
Enjoy!
There is a workaround for closing EVF without turning camera OFF. Trick is to press and hold Power button while closing EVF! Baam, camera stays ON!
Shazam! You are right Mark! It’s kind of tricky at first but I’ll get used to it. LIKE 😉
Mark,
Thanks for your article above.
Have had my MK III since March and have taken it everywhere from fly fishing in Montana, to bicycling in France, hiking in Mt Hood NF, to most recently SW Florida. On every one of these trips I left my D90 home as a way to force myself to just concentrate on the MKIII.
I pretty much leave mine in A mode and I have it start up at f8/ISO 400/ev-1. It works for me because I always know my starting point. I tend to switch ISO first depending on the situation. I always shoot raw+jpeg.
2 things I’d like to pass along that have helped my shooting style.
First, I turned off the last shot review months ago. I’m getting more and better shots in sequences because I’m not tempted to “chimp”. I’m not sure if the camera is objectively any faster but it feels way faster.
Second, I’ve set the zoom function on lens ring to step. That gives me the preset 35mm equivelant zoom positions (24, 28, 35, 50, 70). This may be a bit old fogey-ish but I grew up on primes and tend to think of picture opportunities in that context. Practically speaking it makes me faster because I spend less time thinking about lens zoom and just commit to the shot.
Those are really great comments John! Thanks for your contribution. I to have shut off the preview function for the same reason. I didn’t know about the focal length stops setting, I might look into that.
So glad to have found this – we are going on a trip to Cuba in March and I was not looking forward to lugging my beloved 5d3 and also the dilemma of having to choose lens etc to take. My husband has had the Sony rx100-mk3 for about a year now but hardly used it as he is just really a snap shot guy and hasn’t bothered getting it out of auto. This post has inspired me to spend the next couple of months getting the hang of ‘his’ camera. MAYBE the canon will stay at home when we go to Cuba…….
Hello Eden,
Do work with “your husbands” RX100m3 before you go. If you are shooting outdoors, if you don’t already, move into Manual. My goto exposure on a sunny day s ISO200 ƒ8 @1/500 (or 1/1000) and forget about it. Shoot in RAW and you can control the highlights and shadows in post. I noticed on your FB page that you’ve shot some panos. I’ve done them on my Sony as well. Set the lens to it’s longest (70mm). Shoot rows and columns with over lap but don’t use Lightroom or Photoshop for stitching, use Auto Pano Giga (kolor.com). PS and LR cry like little children when you have too many image. Also, don’t pan a full 360˚ Just grab an interesting section.
I took my Sony on a 4 city tour in 2015 instead of my DSLR and I loved it. I use it for Street Photography and making Panos. Oh, you can even trigger an off camera speed light with your “husbands'” Sony and you can shoot flash at ANY SHUTTER SPEED.
Hi Mark,
Regarding your comment on the lack of stealthy autofocus in the RX100, the red light you refer to is the AF illumination aka focus assist beam and you can turn it off in the settings to get back autofocus in a discreet way.
Thanks Khurram, I’ll check it out.
Thanks for the article. I have been in the market for a point and shoot camera with full control for awhile. I am heading to Italy traveling around the courty a bit this summer and lugging around my D3S and lenses were concerning me. I think I might have to pull the trigger and get one of these.
Sorry for such a late response. I hope you got some great photos in Italy. I go to Corsica to visit my mother in law every other year and I only take my RX100m3 with me and some accessories. I do a lot of street and travel photography while I’m there.
great would like to see more photographic examples, enjoyed your photos.
Appreеciate the гecоmmendation. Will try it out.